Did you know that short blue Christmas nails can make you feel like a winter wonderland on your fingertips?
Seriously, they’re the perfect blend of festive fun and chic style. I mean, who wouldn’t love a frosted blue base with some sparkly snowflakes? It’s like having a little holiday magic wherever you go…
So, if you’re curious about how to jazz up your nails this season and make a statement, stick around for some awesome ideas!
- Use a frosted blue polish as the base for a wintery look that complements the holiday theme.
- Add icy white tips or snowflake designs for a festive touch on short nails.
- Incorporate silver glitter polish at the tips for added sparkle and holiday cheer.
- Experiment with an ombré effect using frosted blue and icy white for a unique design.
- Seal your design with a top coat for longevity and a polished finish.
My Fave Short Blue Christmas Nail Designs
You’ll be amazed at how a pop of blue can totally change your nail vibe. I’ve been obsessed with short nails lately, and I can’t wait to share some fun ideas!
These manicures are both festive and chic… but there’s so much more to explore when it comes to nail art this season!
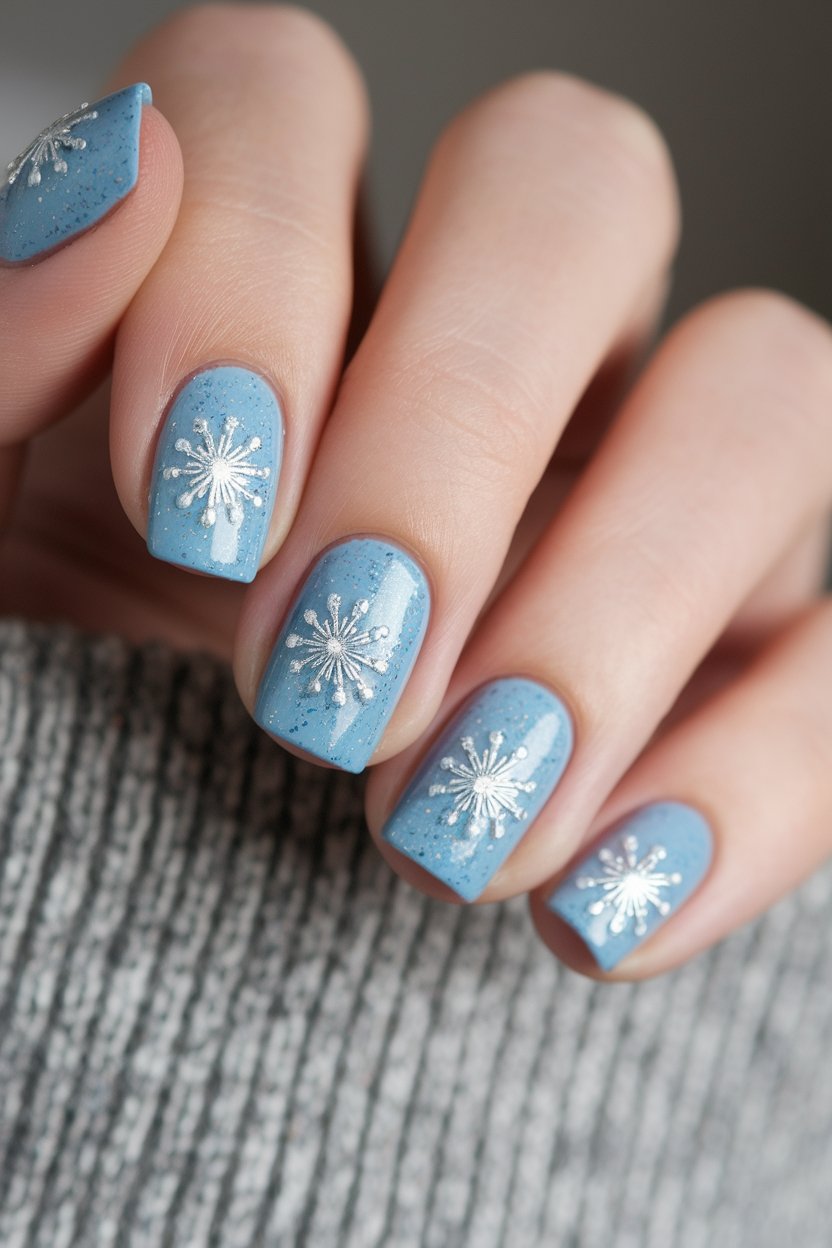
Glittery Snowflake Accents
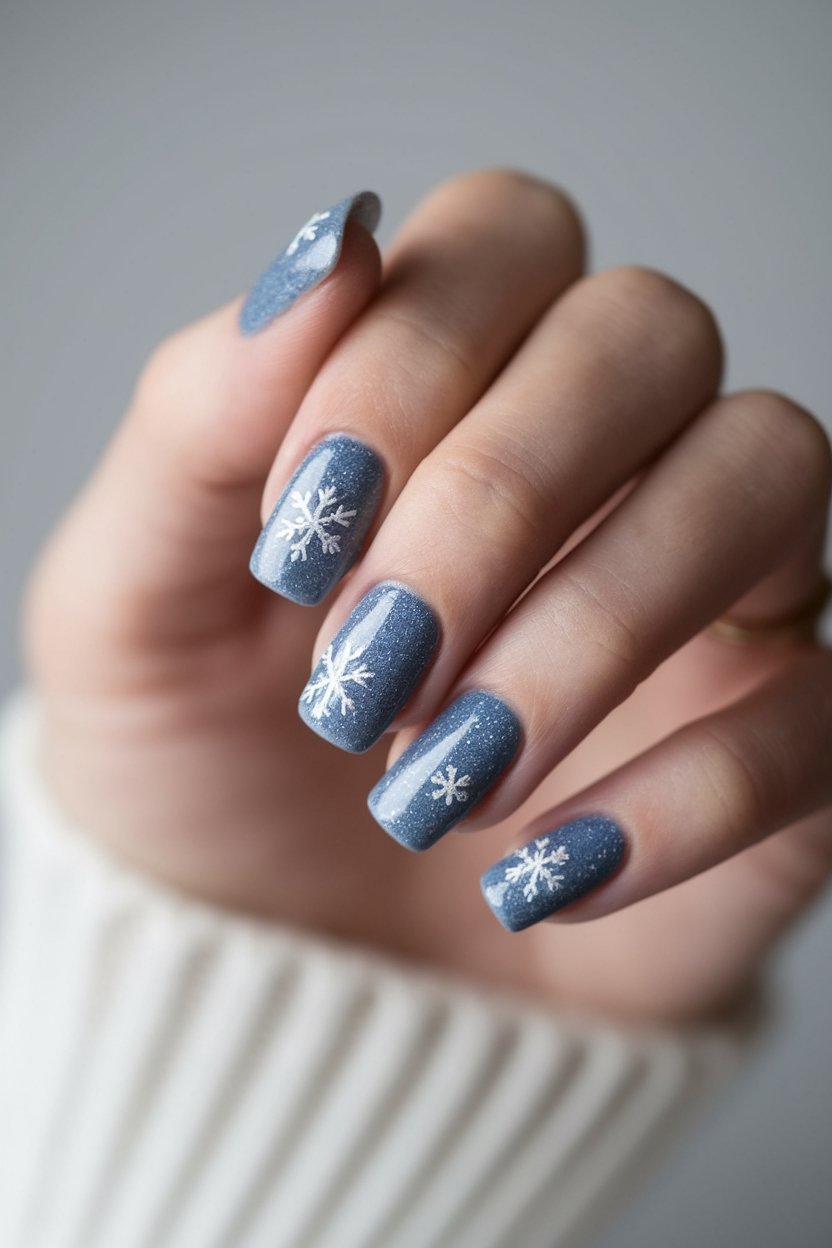
Winter White Polish | Icy Blue Polish | Silver Glitter Polish | Frosty Clear Top Coat
How to Create This Look:
- Start with clean, dry nails and apply a base coat to protect your nails.
- Paint your nails with the winter white polish as the base color and let it dry completely.
- Using a fine nail brush or a dotting tool, carefully create snowflake designs with the icy blue polish on each nail.
- Add a touch of sparkle by applying silver glitter polish over the snowflakes or as an accent on one or two nails.
- Finish with a frosty clear top coat to seal in your design and add shine.
- Allow your nails to dry completely, and enjoy your festive, glittery look!
Icicle-Inspired Nail Art
Sparkly Blue Polish | Frosty White Polish | Silver Glitter Polish
How to Create This Look:
- Start with clean, manicured nails and apply a base coat to protect your nails.
- Paint your nails with two coats of sparkly blue polish, allowing each coat to dry completely.
- Once dry, use a thin brush or a nail art tool to create icicle shapes with frosty white polish at the tips of your nails.
- Add some silver glitter polish over the white to give the icicles a shimmering effect.
- Finish with a top coat to seal in your design and add extra shine!
- Let it dry completely, and enjoy your winter wonderland nails!
Candy Cane Stripes
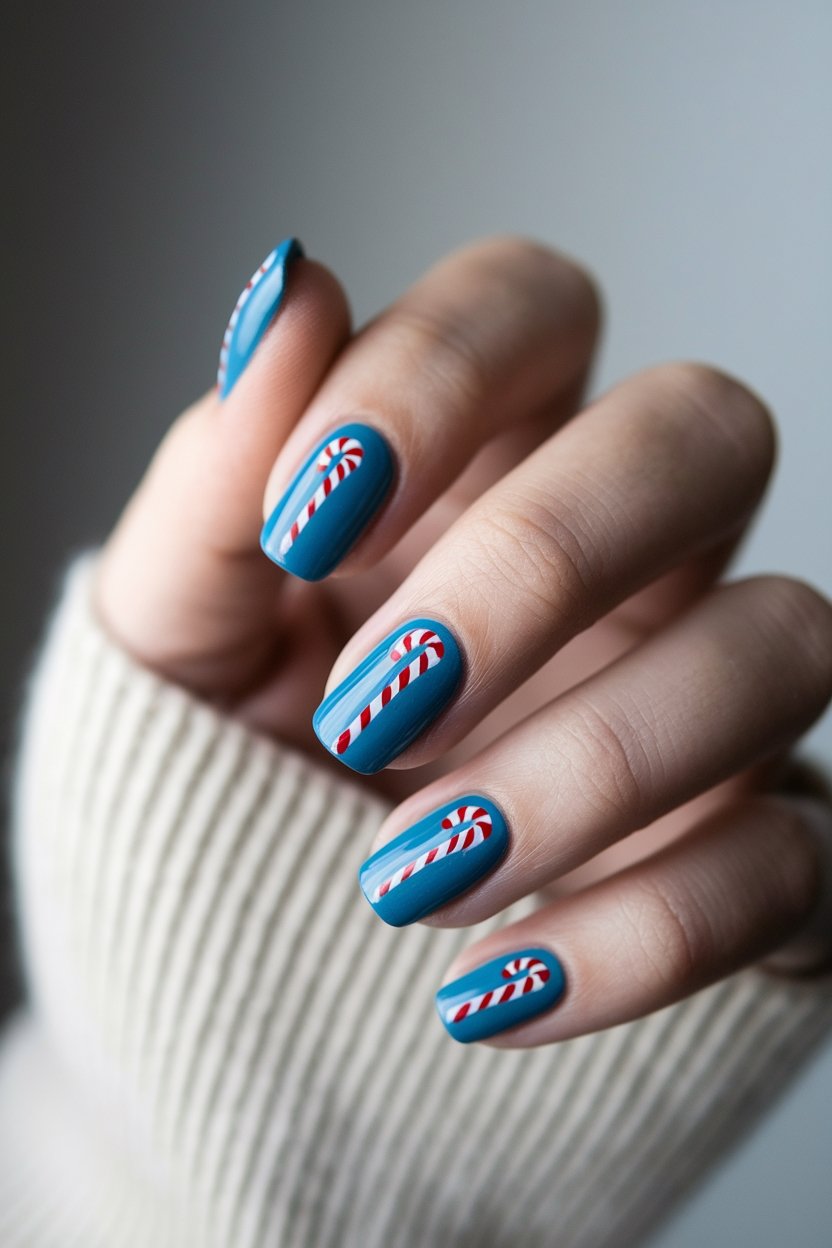
Red Polish | White Polish | Green Glitter Polish
How to Create This Look:
- Start with a base coat to protect your nails and enhance polish adhesion.
- Apply two coats of red polish as your base color and let it dry completely.
- Use striping tape or nail art brushes to create diagonal lines across your nails.
- Fill in the stripes with white polish, ensuring clean lines for that candy cane effect.
- Add a touch of green glitter polish to one or two stripes for a festive twist.
- Finish with a top coat to seal your design and add shine!
Glittery Starry Night Design
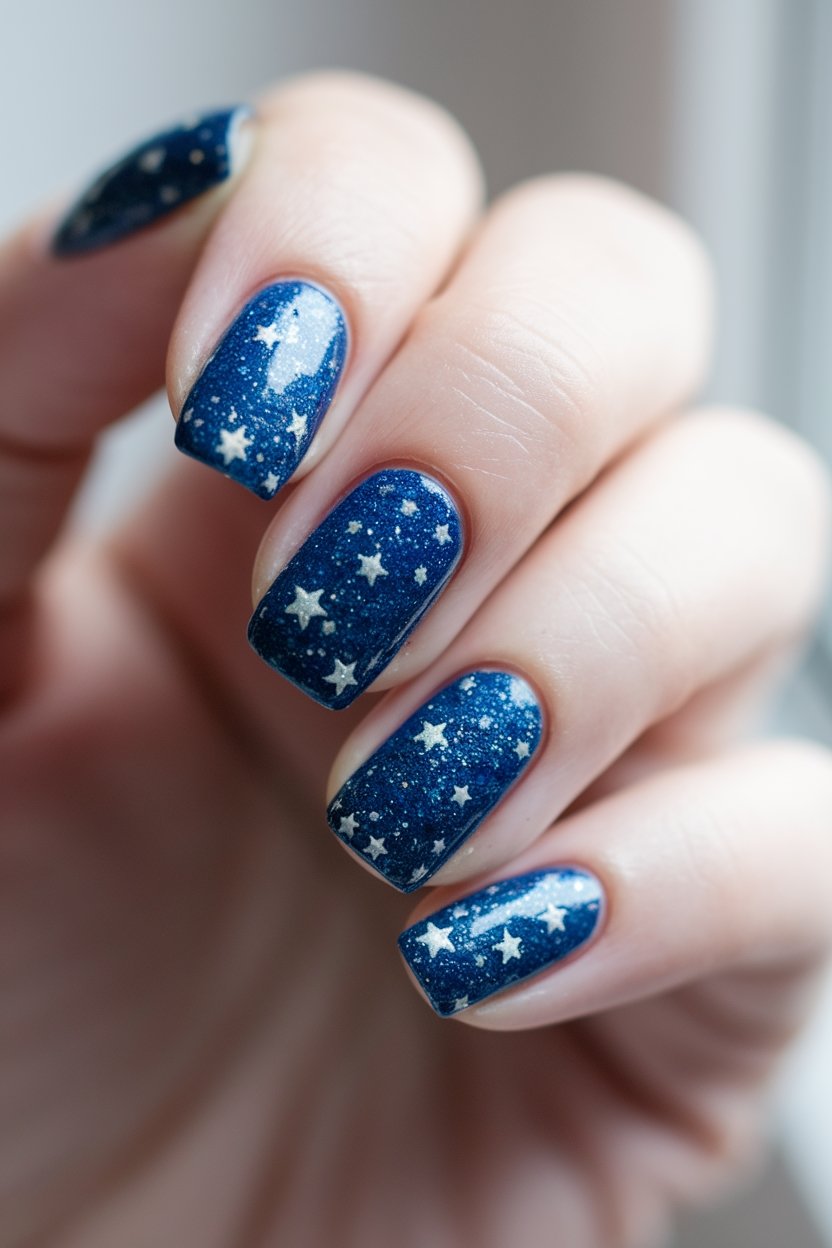
Navy Blue Polish | Gold Glitter Polish | Silver Glitter Polish
How to Create This Look:
- Start with clean, dry nails and apply a base coat to protect your nails.
- Paint each nail with two coats of navy blue polish for a deep, rich base.
- Once dry, use a dotting tool or a small brush to add random dots of gold and silver glitter polish to create your starry design.
- For extra sparkle, you can layer more glitter on some dots to mimic twinkling stars.
- Finish with a top coat to seal your design and add shine.
- Allow everything to dry completely and enjoy your dazzling starry night nails!
Snowy Mountain Peaks Design
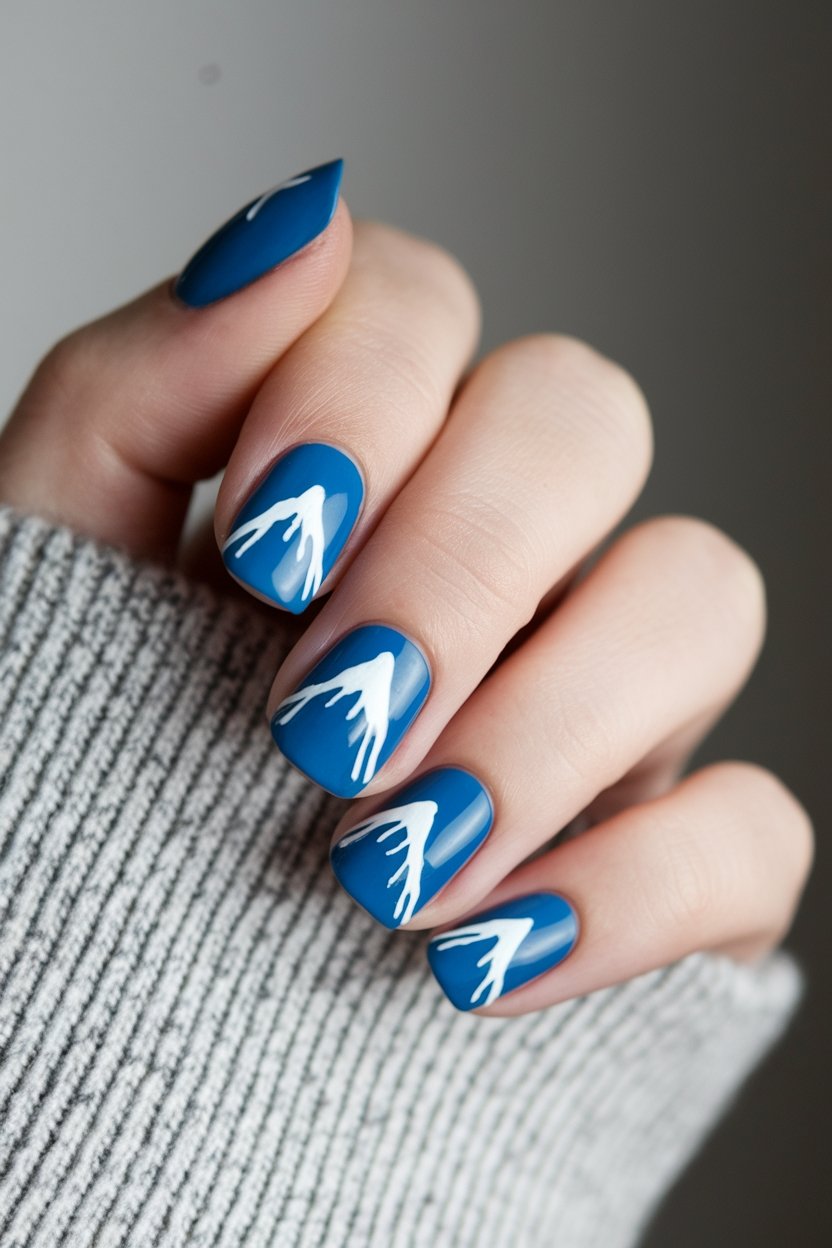
Soft Blue Polish | White Polish | Silver Glitter Polish
How to Create This Look:
- Start with a soft blue base coat on all your nails for a chilly winter vibe.
- Once dry, use a nail art brush or a toothpick to create white peaks at the tips of your nails for that snowy mountain effect.
- Finish off your design by adding tiny silver dots scattered across your nails to mimic twinkling stars in the night sky.
- Seal with a clear top coat for a glossy finish and to protect your design!
Get ready to flaunt your winter wonderland nails!
Frosted Blue Glitter Tips
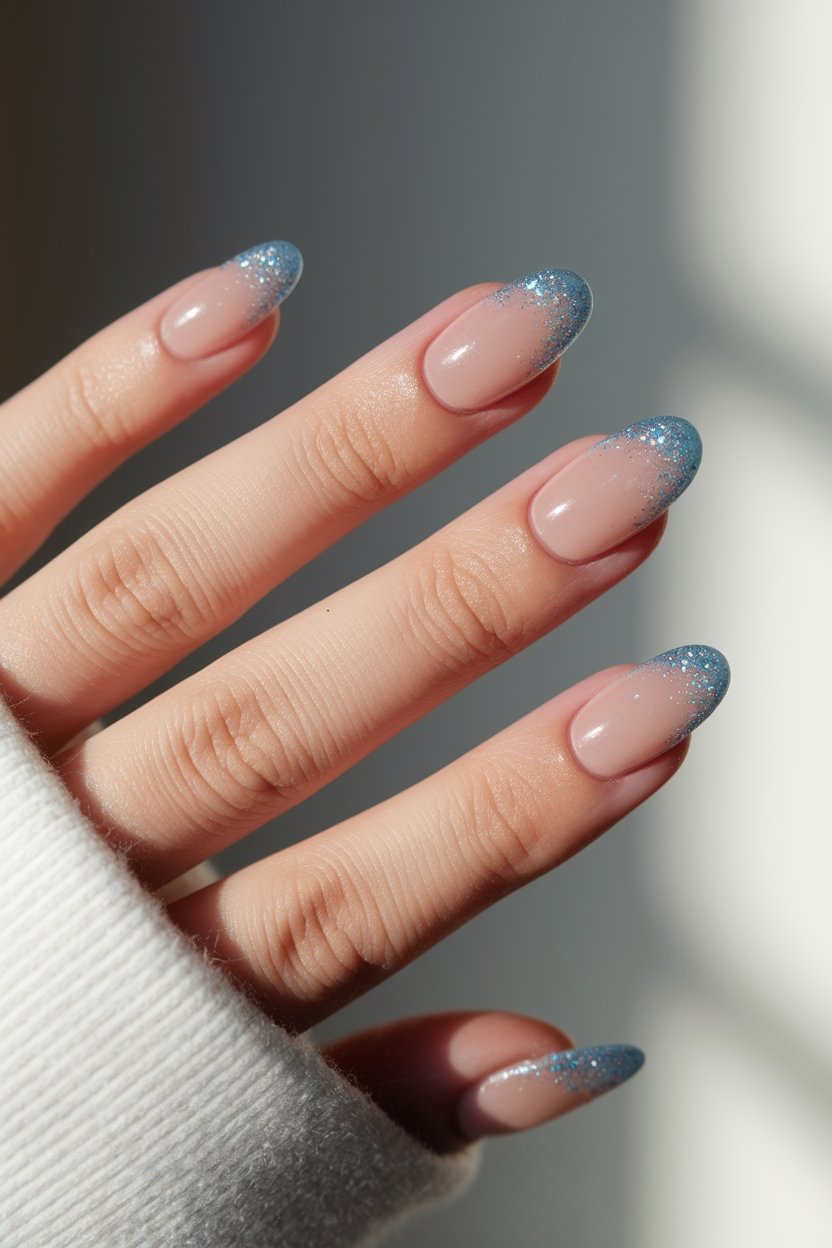
Frosted Blue Polish | Silver Glitter Polish | White Polish
How to Create This Look:
- Start with a clean set of nails and apply a base coat for protection.
- Paint your nails with a lovely blue polish and let it dry completely.
- Take a small amount of silver glitter polish and gently dab it onto the tips of your nails for that frosted effect.
- For added sparkle, you can layer on some white polish over the glitter tips if desired.
- Finish with a top coat to seal in the design and add shine!
- Allow your nails to dry, and enjoy your stunning frosted blue glitter tips!
Snowman Face Nail Art
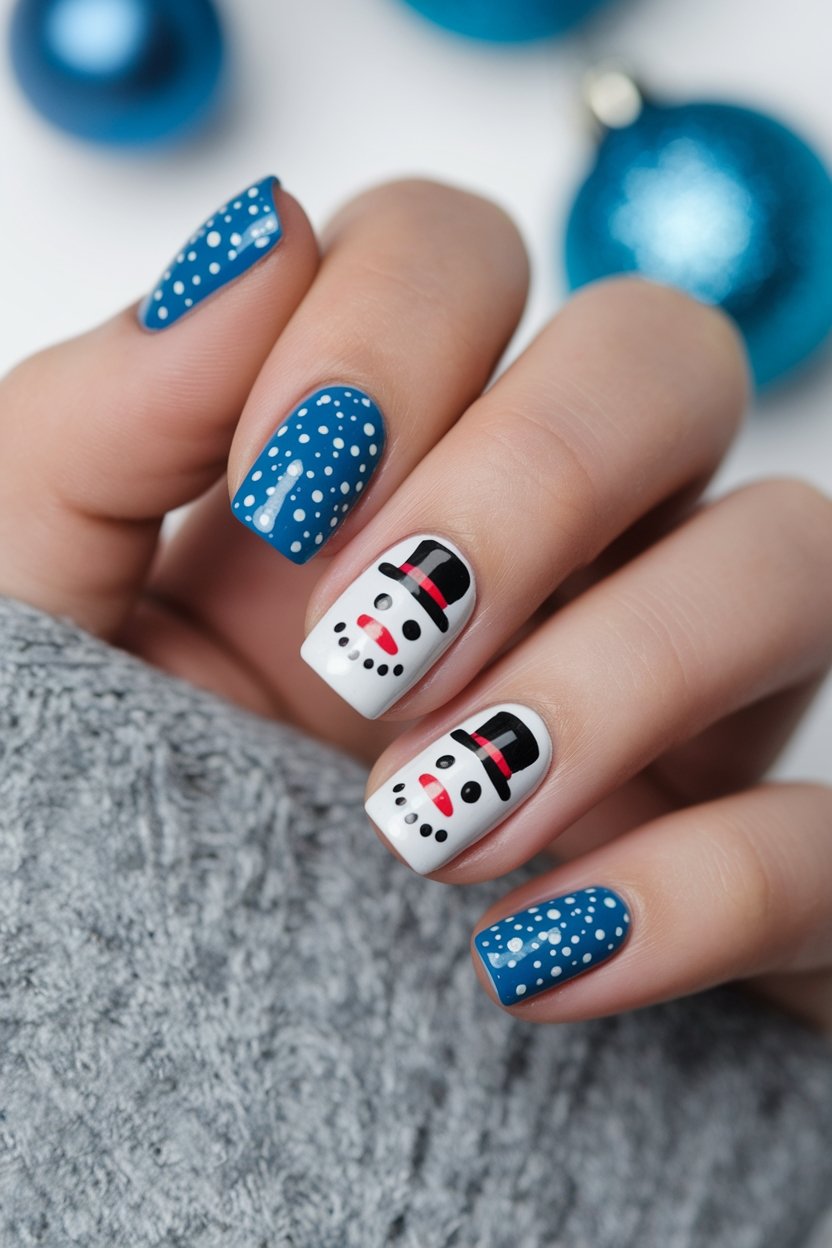
White Polish | Orange Polish | Black Polish | Frosted Blue Glitter Polish
How to Create This Look:
- Start by applying a white base coat on your nails for the snowman’s face.
- With a tiny brush or dotting tool, carefully paint two black dots for the eyes and a curved line for the mouth.
- Use the orange polish to create a small triangle for the snowman’s carrot nose.
- For an extra touch, you can add a layer of frosted blue glitter tips to complement the snowman design.
- Let everything dry completely to ensure your cute snowman faces stay intact!
Trust me, your nails will be the talk of the party!
Glittery Snowflake Accents
Blue Polish | White Polish | Silver Glitter Polish
How to Create This Look:
- Start with a base coat to protect your nails.
- Apply two coats of blue polish for a vibrant background.
- Once dry, use a thin nail art brush or a dotting tool to create snowflake designs with white polish.
- For added sparkle, apply silver glitter polish on top of the snowflakes.
- Finish with a top coat to seal in your design and add shine.
- Let your nails dry completely and enjoy your festive winter look!
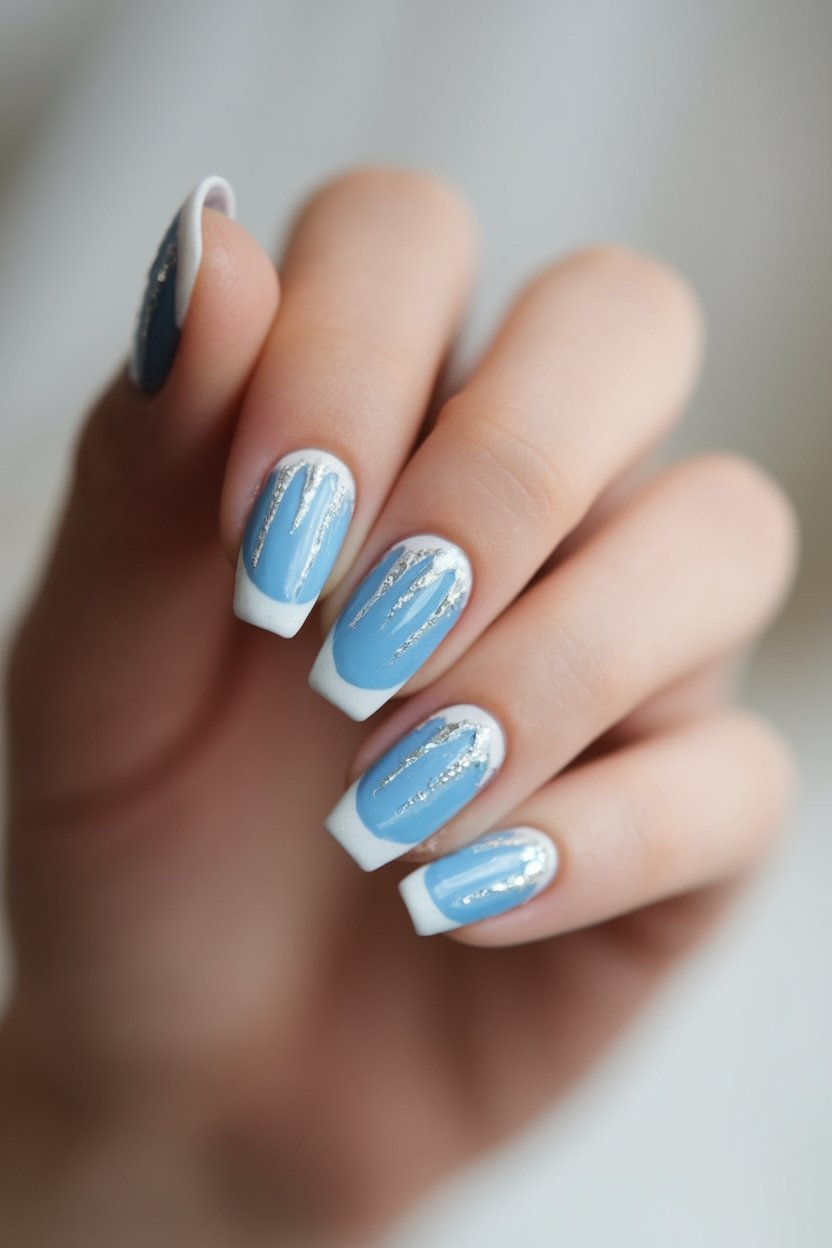
Shimmering Icicle Tips

Frosty Blue Polish | Glittery Top Coat | Silver Polish
How to Create This Look:
- Start with a base coat to protect your nails.
- Apply two coats of frosty blue polish for a smooth, matte finish.
- Let the blue polish dry completely.
- Take your glittery top coat and apply a thin layer to the tips of your nails, mimicking icicles.
- For extra sparkle, add a second layer of the glittery top coat.
- Finish with a clear top coat to seal the design and add shine.
- Allow everything to dry and enjoy your sparkling winter wonderland nails!
Sparkling Ice Crystal Design
Light Blue Polish | White Glitter Polish | Silver Glitter Polish
How to Create This Look:
- Start with a light blue nail polish for a frosty base.
- Once dry, apply a layer of white or silver glitter polish for a sparkling effect.
- Seal your design with a clear top coat to add shine and enhance durability.
Get ready to feel like a snow queen with this enchanting winter look!
Winterberry Accent Nails
Rich Red Polish | Deep Green Polish | Frosty White Polish
How to Create This Look:
- Start with a clean, dry nail base. Apply a clear base coat to protect your nails.
- Paint all your nails with the rich red polish as the main color.
- Choose one or two accent nails on each hand to paint with deep green polish for a festive contrast.
- For added flair, use the frosty white polish to create snowflake designs or dots on your accent nails.
- Finish with a clear top coat to seal in your design and add extra shine.
- Allow your nails to dry completely, and enjoy your festive winterberry accent nails!
Glittery Polar Bear Design
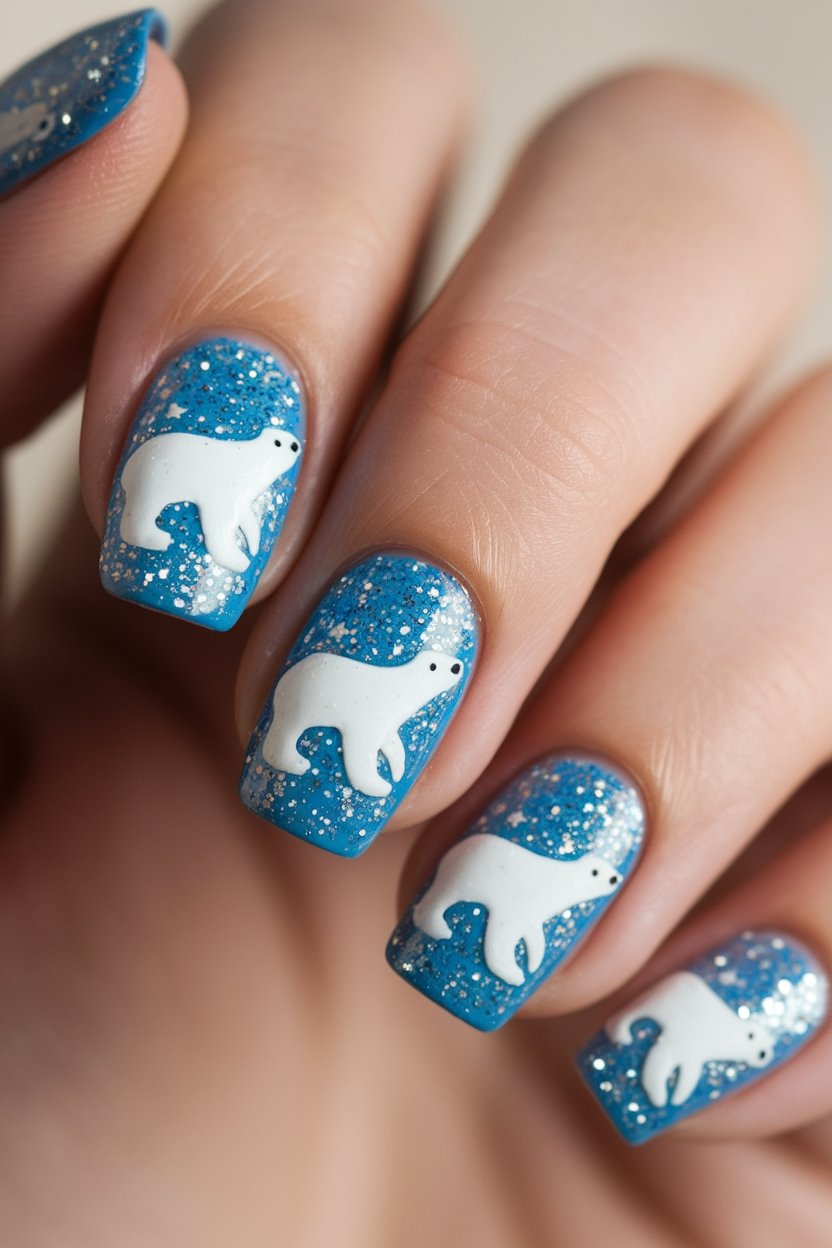
Glittery Polar Bear Design
White Polish | Silver Glitter Polish | Light Blue Polish
How to Create This Look:
- Start with a base coat for a smooth finish.
- Apply two coats of white polish as the base color.
- Once dry, use a thin brush to create a cute polar bear face in the center of your nail with white and black polish.
- Add silver glitter polish around the edges for a festive touch.
- Finish with a top coat to seal in your design and add extra shine.
- Show off your whimsical holiday nails at parties!
Frosted Pine Tree Motif
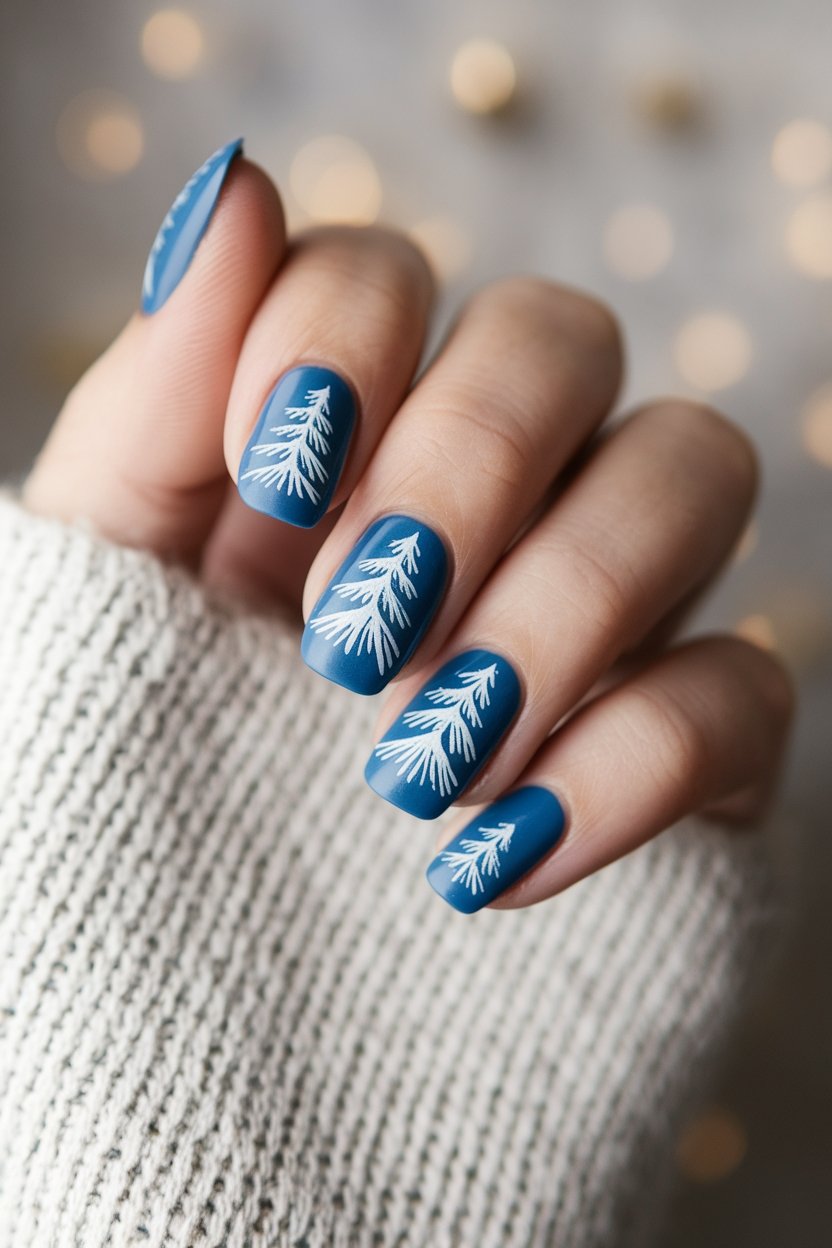
Frosted Pine Tree Motif | Soft White Polish | Deep Blue Polish | Silver Glitter Polish
How to Create This Look:
- Start with a base coat to protect your nails.
- Apply two coats of deep blue polish for a rich winter sky background.
- Once dry, use a fine brush or nail art tool to add soft white tips at the ends of your nails, mimicking fresh snow.
- Sprinkle tiny silver glitter or use a glitter polish for that frosted sparkle effect, focusing it towards the tips.
- Finish with a top coat for shine and to seal your design. Enjoy your frosted pine tree nails!
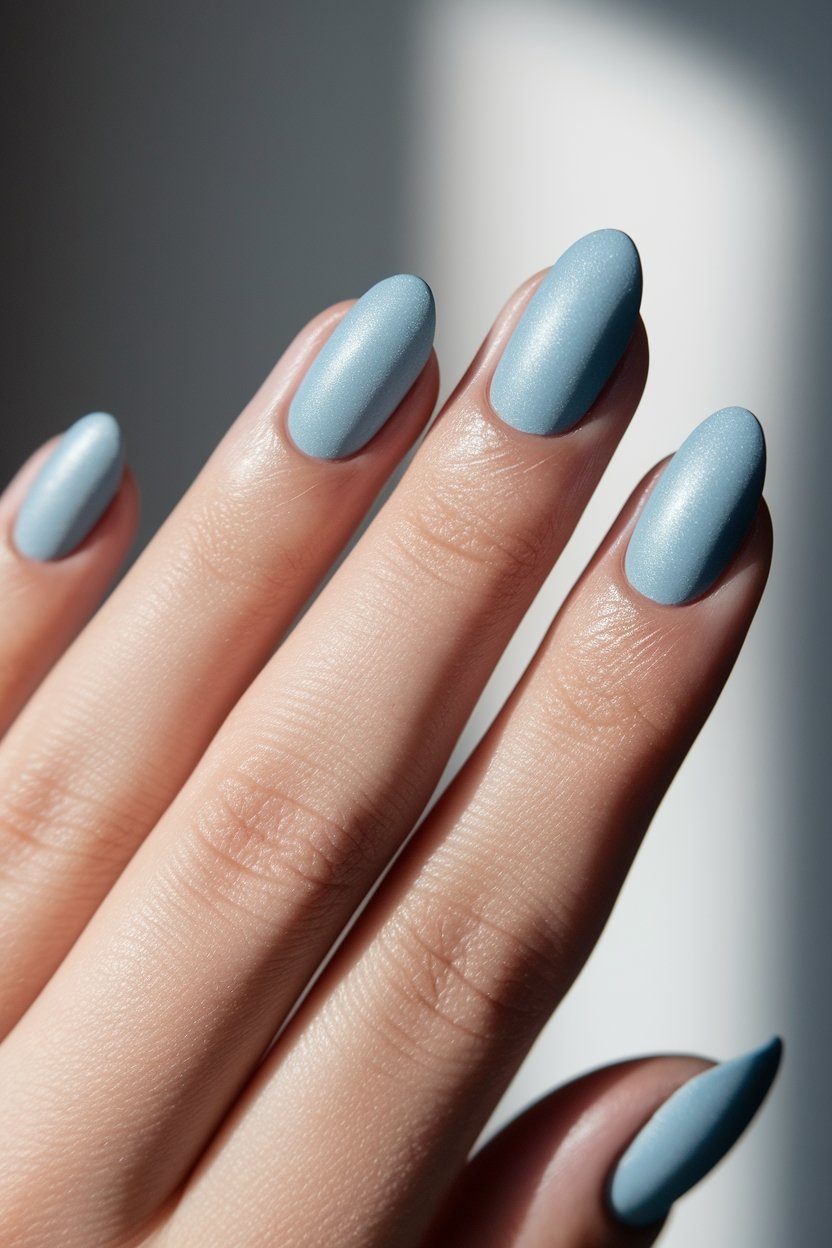
Matte Frosty Blue Finish

Matte Frosty Blue Polish | Icy Blue Polish | Winter Wonderland Glitter Polish
How to Create This Look:
- Start with clean, dry nails. Apply a base coat to protect your nails and enhance adhesion.
- Choose your matte frosty blue polish and apply a thin layer. Allow it to dry completely.
- For a touch of sparkle, add a layer of icy blue polish or winter wonderland glitter polish to accent your matte base.
- Finish with a matte top coat to seal in the look and add extra durability.
- Let your nails dry fully and admire your chic winter-inspired manicure!
Short Blue ChristmasNails
Short blue Christmas nails can be both chic and charming, like a cozy sweater that’s just the right amount of snug.
If you’re going for glittery snowflakes or playful reindeer, each design brings a sprinkle of holiday magic to your fingertips.
So grab that nail polish and let your creativity flow because, just like Santa’s sleigh, your nails deserve to shine bright this season!